Netflash support and
troubleshooting

Netflash support and
troubleshooting
At Netflash, our primary goal is helping you
Below we have a list of answers to some frequently asked questions.
Our skilled team of specialists will work with you to seek the answer to your problem if you have any troubles with this information.
Fibre Optic Internet, also known as Fibre Internet, is a type of internet connection that uses Fibre-optic cables to transmit data. These cables are made up of thin strands of glass or plastic that use light to transmit data signals over long distances.
Fibre internet offers several advantages over traditional copper wire connections. First, fibre cables can transmit data much faster and over longer distances without experiencing signal degradation. This means you can download and upload files, stream videos, and play online games with less latency and buffering.
Additionally, Fibre-optic cables are less susceptible to interference from electromagnetic signals and weather conditions, which means the connection is more stable and reliable.
Overall, fibre internet is a highly advanced technology that offers blazing-fast speeds and improved reliability compared to traditional copper wire connections.
Here’s a brief technical overview of how Fibre Internet works:
Traditionally, data is sent from your device to your local network or Netflash (ISP) through a copper wire or wireless connection. The Fibre Internet connection process is different.
With Fibre; When the data reaches Netflash servers, it’s converted into a beam of light and sent through a Fibre-optic cable that runs to a nearby “headend.”
At the headend, data is converted back into an electrical signal and routed to its destination on the internet.
The data may travel through several more Fibre-optic cables and networks before it reaches its final destination, such as a website or gaming server.
Yes, however for Fibre speeds above 500 Mbps a Netflash supplied router will give you the best performance and support the latest Wi-Fi standards for better coverage.
Yes, you will require a device similar to a modem called an ONT for fibre which is installed by a Netflash Technician during the initial setup of your service.
Yes. All of our Fibre Internet packages are unlimited, so you never have to worry about going over again.
No. Netflash does not throttle or block any Internet traffic.
While Netflash fibre internet offers faster and more reliable speeds than traditional copper networks, it is not immune to slowing down under certain conditions out our control such as;
- Remote Server Network Congestions: Too many people using a specific service such as a gaming site may experience slow down on your connection to that particular server.
- Router Limitation: Your router may not be able to handle the high speeds offered, which can limit your connection speed.
- Poor WiFi coverage in your home (the further you are away from the router, the slower speeds will become)
- Computer or Device Limitations such as aging less powerful computers may not be able to take full advantage of fibre internet speeds.
That being said, fibre internet is generally less likely to slow down and are often less severe and of shorter duration. If you are experience slowdowns please contact our Technical Support to help diagnose the perceived issue.
Yes, these are available at an additional cost for both Residential & Business Customers.
Wi-Fi for your network will depend on several factors, such as the size of your home or office, the number of devices you need to connect, and the activities you will be doing online. Here are a few options to consider:
Wi-Fi 5 (802.11ac): This is a common Wi-Fi standard that offers good speed and range for most households. It can support multiple devices and is compatible with most devices.
Wi-Fi 6 (802.11ax): This is the latest Wi-Fi standard and offers faster speeds and better performance than Wi-Fi 5. It can handle more devices and is ideal for streaming high-definition video and online gaming.
Mesh Wi-Fi: This is a system of multiple access points that work together to provide seamless coverage throughout your home or office. Mesh Wi-Fi is ideal for large or multi-story buildings, where a single router may not provide adequate coverage.
Ultimately, the best type of Wi-Fi for your network will depend on your specific needs and budget. It’s a good idea to consult with a Netflash Technician to have an assessment to determine the best solution for your situation
The setup is simple
Connect your STB (Set top box) to the internet and your TV. Done! You don’t have to enter a login or password, or anything. The IPTV system will automatically recognize your STB. If your TV is having issues connecting – Please don’t hesitate to call us for technical support.
The Netflash IPTV is setup with NorthWaveTV services and runs on Amazon, Apple and Roku streaming devices in addition to our Set Top Boxes.
Setup Guides & Supported Devices
To get the best IPTV experience – Netflash suggests using officially supported devices. Currently, they are Amazon FireStick (and Fire TV Stick 4K), Roku Streaming Stick+, Roku Streaming Stick 4K and the newest Apple TV set-top boxes. Most older devices may struggle or be incompatible.

Download Fire TV Setup Guide
(FireTV Stick Lite is not supported)
Frustrating right!!
Some programs and live broadcast events are under black-out restrictions because of national or regional licensing for that specific program. This is at the discretion of the broadcaster. Neither Netflash nor NorthWaveTV has control over this.
For example:
Trying to watch the Toronto Maple Leafs on TSN? Can’t do it. You will need to change the channel to Sportsnet Ontario.
The reason for this is only Rogers Sportsnet holds the NHL rights to broadcast Toronto Maple Leaf games in Southwestern Ontario.
For more details on Rogers Sportsnet regional agreements please visit Sportsnet FAQs.
Below is a small list of links providing additional information for router setup:
Wireless Setup Guide
Covers a wide range of brands and models in a step-by-step fashion
Router Default Passwords
Huge list of model and brand-specific user names and passwords
Interactive Router Screenshots
Wide variety of models and brands
Important information about your
emergency 9-1-1 service
Please Read and Retain for Your Records.
Your Home Phone comes with an emergency 9-1-1 service that is similar to the traditional 9-1-1 service of a land line, however because it connects to the internet and not the telephone line, there are some important differences and limitations to be aware of that impacts the emergency service.
IMPORTANT: Remember that the 9-1-1 emergency service will not function in the event of a power or broadband outage or if your broadband, ISP service is suspended or terminated.
9-1-1 Service
If you dial 9-1-1, then you will be automatically routed to a specialized call centre that handles emergency calls. This call centre is different from the Public Safety Answering Point (PSAP) that would answer a traditional emergency call. In addition, with E911 service, your call back number and address are visible to the emergency response centre call-taker.
The call centre operator will confirm your location information and call back number and then transfer your 9-1-1 call to the emergency response centre that is nearest to your location. Do not hang up unless told directly to do so and if disconnected, you should dial 9-1-1 again. If you are not able to speak during the 911 call, the operator will dispatch emergency response vehicles to your last registered address.
If you are using your Home Phone service at a different location in Canada, the 9-1-1 service will still work, although you will need to communicate to the operator what location you are placing the 9-1-1 call from so that the emergency response vehicles can be dispatched to that address.
9-1-1 access limitations
- If your Internet connection is down or your Home Phone service is not available, e.g. in the case of a power failure, then the 9-1-1 Service will NOT be available.
- The Emergency 9-1-1 Service may not be available if you are calling from outside Canada.
- Upon any move to a new address, or change of use of your Netflash Home Phone service, immediately advise us Email or by telephone at 1-877-638-3527 or your access to 9-1-1 Service will not work.
Please note these important tips
- Make sure that you understand any 9-1-1 limitations of your Home Phone service. Also ensure that other users of the service such as family members and guests are also aware of these limitations.
- Be prepared to confirm your location and call-back number with the operator who answers the 9-1-1 call since the operator may not have this information.
- During the 9-1-1 call, be sure not to not hang up until told to do so, and call back if you get disconnected.
- 9-1-1 Service will not be available during a power outage or during an Internet outage. Therefore, it is always a good idea to have a backup power supply, such as UPS for such circumstances.
Make sure that your location information is always current in our records since the emergency operator will assume that you are at the last registered address if you are unable to speak during a 9-1-1 call.
Description |
By default, the POP protocol downloads your mail and stores it on your computer purging it from our mail servers. This is a great option if you only access your email through a single laptop. |
Type |
POP3 |
Address |
mail01.netflash.net |
Port |
995 |
Username |
Your full Netflash email address
(example: yourname@domain.ca) |
Password |
Your Netflash email password |
SSL |
ON |
Description |
IMAP syncs your mail client with our mail server. Mail remains on our server and in turn IMAP should be used if you intend to access your inbox from multiple laptops. |
Type |
IMAP |
Address |
mail01.netflash.net |
Port |
993 |
Username |
Your full Netflash email address
(example: yourname@domain.ca) |
Password |
Your Netflash email password |
SSL |
ON |
Description |
This server can be used over any network (including the Netflash network). This server does require authentication. |
Type |
SMTP |
Address |
mail01.netflash.net |
Port |
465, 587, or 8025 |
Username |
Your full Netflash email address
(example: yourname@domain.ca) |
Password |
Your Netflash email password |
SSL |
ON |
- Open Outlook, and go to the File tab on the upper-left side of the window and under info, select Account Settings > Account Settings
- Click the New button.
- Check the manual setup or additional server types box and click Next.
- Check POP or IMAP and click Next
- Type in your Name: this is the name that your recipients will see in the “From” field of e-mails that you send.
- Enter your FULL email address and click Next. (ex: name@netflash.net)
- Under e-mail servers,
- Select POP3 as Incoming e-mail server type.
- Enter mail01.netflash.net as your “Incoming mail server”
- Enter mail01.netflash.net as your “Outgoing mail server”
- Enter your complete email address in the E-mail username text field and your email account password in the Password text field. Check “Remember password” if you don’t wish to type it in every time you check mail.
- Click the more settings button
- Click the outgoing server tab and check “My outgoing server requires authentication” just underneath this option, select “Use same settings as my incoming mail server”
- Change Outgoing server (SMTP) from the default 25 to 465
- Set “Use the following type of encrypted connection” to SSL
- Click OK to close the window
- Click Next then Finish.
- You’re Done! Click Send/Receive to receive email, or New emil to compose a new message.
- Press the start button and select the mail app or type mail and press enter.
- If this is the first time you’re opening the apps, you’ll see the Welcome page. Follow the instructions to add an account. Otherwise:
In the Mail, select Settings at the bottom left(Gear Icon)
Go to Accounts > Add Account, choose Advanced Setup at the bottom of the list - Enter the Following details:
Account Name: This is a friendly name for the account such as “Netflash or your email address”
Your Name: this is the name that your recipients will see in the “From” field of e-mails that you send
Incoming email server: mail01.netflash.net
Account Type: POP3
E-Mail: Enter your FULL email address and click Next. (ex: name@netflash.net)
Username: Enter your FULL email address and click Next. (ex: name@netflash.net)
Password: Your email account password
Outgoing (SMTP) email server: mail01.netflash.netNow check the following boxes:Outgoing requires authentication
Use same username and password for sending mail
Requires SSL outgoing - Click the sign in button and you’re done!
- Open Mail
- The first time you open Mail, it may prompt you to add an email account (if you haven’t yet done so), otherwise to add another account, choose Mail > Add Account
- Select an account type of “Add Other Mail Account”
- Enter the following information and click on the Create Button.
Full Name: Type in your Name: this is the name that your recipients will see in the “From” field of e-mails that you send.
Email Address: Enter your FULL email address. (ex: name@netflash.net)
Password: Your email account password - If necessary, Mail might ask you for additional settings. Below is a full list of settings that may be required
Incoming mail server settings
Account Type: Choose POP
Description: This is a friendly name for the account such as “Netflash or your email address”
Incoming Mail Server (POP): mail01.netflash.net
User Name: Enter your FULL email address and click Next. (ex: name@netflash.net)
Password: Your email account password
Authentication: Choose Password
Port: 110
SSL: NoOutgoing mail server (SMTP) settings
Outgoing mail server (SMTP): mail01.netflash.net
Port: 465
SSL: Yes
Authentication: Choose PasswordAfter entering the additional settings click on the Create Button and you’re ready to use Mail for OS X.
Overview
The process of setting up email on a iPhone is a simple one. A new email account is added and required information such as incoming/outgoing address, username and password is entered.
Process
- Start by navigating to Settings from your home screen then select Mail, Contacts, Calendars.
- From the Mail application menu select Add Account.
- From the list of email providers select Other
- Next it’s time to enter the account information starting with account type. The choices are listed along the top are IMAP or POP. After selecting the email account type continue down the screen entering in the required account information, then press Next.Name: This is the name that your recipients will see in the “From” field of e-mails that you send.
Email Address: Enter your FULL email address (ex: name@netflash.net)
Password: Your email account password
Description: This is a friendly name for the account such as “Netflash or your email address” - Enter the additional information that is requested and press Next.
Incoming/Outgoing server addresses: mail01.netflash.net
Username: Enter your FULL email address (ex: name@netflash.net)
Password: Your email account password - Now select Save and the email account information will be verified. By default it verifies the information with password encryption and SSL. Hit Save again to save and create the email account.
Overview
The process of setting up email on a Android is a simple one. A new email account is added and required information such as incoming/outgoing address, username and password is entered.Process
- Start by tapping the Launch button to open the list of application.
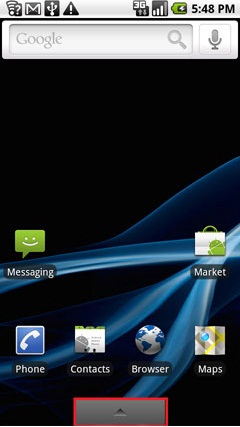 From the application list tap Email.

- Next enter your email address and password then tap Next.
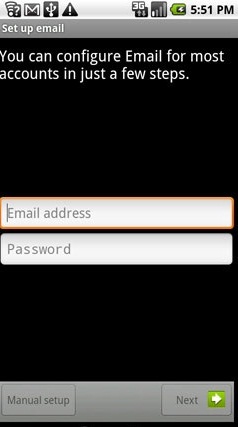 Select the type of account you want to setup (POP/IMAP/Exchange).
- Next enter the required information for incoming and outgoing server settings then tap Next.Select the desired account options such as email checking frequency, set as default mail account, and notifications. Tap Next.
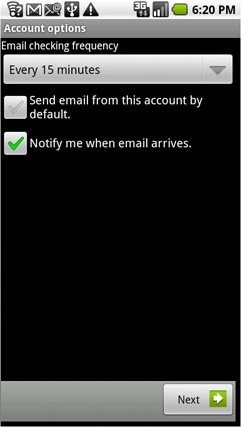
- To finish enter the desired label for the account and display name for outgoing emails. Tap Done.
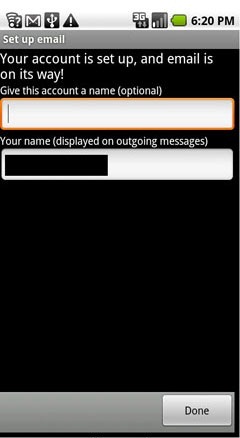
You now have the option to pay for your Netflash Internet service through online banking.
Simply:
- Login to your online banking
- Go to ‘set up payee/biller’
- Search for Netflash Internet Solutions and enter your account number
- That’s it! Start paying bills conveniently and easily
Bank / Financial Institution
BMO
CIBC
RBC
Scotia Bank
TD Canada Trust
| Don’t see the information you are looking for? | Toll free: | 1 877 638 3527 |
| Our support specialists have many answers and are happy to help. |
